Automating terminal screenshots and videos for documentation
Manual terminal screenshots are tedious and inconsistent across tutorials. A headless tmux session with pyte ANSI parsing and Pillow rendering produces pixel-perfect 1070x625 PNGs, MP4 recordings at 4 FPS, and direct Vimeo uploads. One Python CLI with 12 subcommands replaces all the manual screenshotting and cropping.
What you will learn
- How headless tmux sessions and a Python ANSI renderer eliminate manual screenshot drudgery for CLI documentation
- The marker-based completion detection trick that lets you know precisely when a command finishes in a detached terminal
- Why a custom pyte plus Pillow pipeline beats existing tools like freeze and termshot for programmatic screenshot generation
- How to chain screenshots, video recording, annotation, and Vimeo upload into a single automated workflow
You can automate terminal screenshots and video recordings entirely from a headless Python script. No screen recording software, no manual cropping, no inconsistent font rendering. A tmux session runs in the background, pyte parses the ANSI escape codes, and Pillow renders each frame to a pixel-perfect PNG. That’s the whole idea.
But why would anyone build this? Honestly, the answer is yak shaving. I needed screenshots of Claude Code running in a terminal for blog posts. Taking them manually was annoying. Inconsistent window sizes. Stray notification banners. The cursor blinking in the wrong spot. So the problem spiraled into building a proper tool, which is probably how most developer tools get born.
The problem with manual terminal screenshots
Documenting CLI workflows for tutorials, blog posts, or onboarding materials means taking screenshots of terminal output. Everyone does it the same way. Run the command. Switch to the screenshot tool. Drag a rectangle. Save. Crop. Hope the font size matches the last screenshot you took three weeks ago.
This falls apart fast. Screenshots taken on different days have different terminal widths. Dark mode versus light mode. That one screenshot where your Slack notification popped up mid-capture. The font rendering changes because you resized the window. For a single blog post with 5-8 terminal screenshots, I think most developers spend 20-30 minutes just on the image capture and cleanup.
Multiply that across a documentation site with dozens of tutorials. It’s a proper mess.
The existing tools in this space each solve part of it. Charmbracelet’s VHS lets you write declarative .tape scripts that describe terminal sessions, producing GIFs and MP4s. Brilliant tool. Charmbracelet’s freeze generates images from code snippets and terminal output with polished window chrome. asciinema records terminal sessions as lightweight asciicast files, and its agg tool converts them to GIFs. termshot captures ANSI escape codes from piped command output and renders them to PNG.
That said, none of them solve the full problem when you need programmatic control. VHS needs a graphical environment. freeze works on static code, not live terminal sessions. asciinema records real-time sessions but doesn’t give you frame-by-frame screenshot access. What I wanted was something a script could drive entirely: create a session, send commands, wait for completion, take a screenshot, record video, upload to Vimeo. All headless. All JSON output.
The architecture behind headless terminal capture
The tool chain works like this. tmux 3.6a provides the headless terminal session. pyte (a Python VT100-compatible terminal emulator from Selectel) parses the ANSI escape sequences into a character grid with color and style attributes. Pillow renders that grid to PNG images using Menlo at 14pt with 4 font variants: regular, bold, italic, and bold-italic. ffmpeg stitches captured frames into MP4 video. And PyVimeo handles the upload.
The data flow looks roughly like:
tmux (headless session)
  -> capture-pane -e (ANSI text with escape codes)
    -> pyte (terminal emulation / parsing)
      -> Pillow (PNG rendering, cell-by-cell)
  -> background frame grabber (4 FPS)
    -> ffmpeg (MP4 stitching, yuv420p)
  -> vimeo_upload.py (unlisted Vimeo upload)
The default terminal is 130 columns by 35 rows. At 14px Menlo with 15px padding on each side, that produces approximately 1070x625 pixel images. Close enough to the standard 1200x630 Open Graph image size that you can use these directly as social sharing images with minor adjustment. For what it’s worth, this dimension wasn’t planned; it just fell out of the font metrics naturally.
pyte handles all 256 ANSI colors plus truecolor (24-bit RGB via hex codes like #FF5733). The color resolver walks through named colors, the 6x6x6 color cube (indices 16-231), the grayscale ramp (indices 232-255), and hex truecolor values. Every cell in the 130x35 grid gets individually rendered with its foreground color, background color, and style attributes. Bold, italic, underscore, strikethrough, and reverse video all work.
The marker-based completion detection trick
Here’s the janky-but-effective part. When you send a command to a detached tmux session, how do you know when it’s done? You can’t watch for the prompt to reappear because prompts vary. You can’t parse the output because you don’t know what to expect. Polling on a timer is unreliable since some commands finish in milliseconds, others take minutes.
The solution: immediately after sending the user’s command, send a second command that echoes a unique marker string.
marker = f"__DONE_{int(time.time())}_{os.getpid()}__"
# Send user command
tmux send-keys "ls -la" Enter
# Send marker echo
tmux send-keys f'echo "{marker}"' Enter
Then poll the tmux pane content until that marker appears. The timestamp and PID make each marker unique, so there’s no confusion between consecutive commands. The tool captures the pane text before sending and after the marker appears, then extracts only the lines between the user’s command and the marker echo. Clean output, reliable detection.
The JSON output from every subcommand looks like this:
{"ok": true, "output": "total 16\ndrwxr-xr-x 5 user ...", "exit_marker_found": true}But the marker itself is visible in the terminal buffer. That’s a problem for screenshots. So there’s a clean screenshot pattern. You send the command with --clear-after (which clears the screen after the marker is detected), then re-send the same command with --no-wait (fire-and-forget, no marker appended). The result is a terminal showing only the command and its output. No marker artifacts.
Here’s an annotated screenshot showing the clean output with a step label applied automatically:

Turns out this two-pass approach works better than trying to hide the marker in the first place. Simpler code, more predictable results.
From screenshots to video to Vimeo
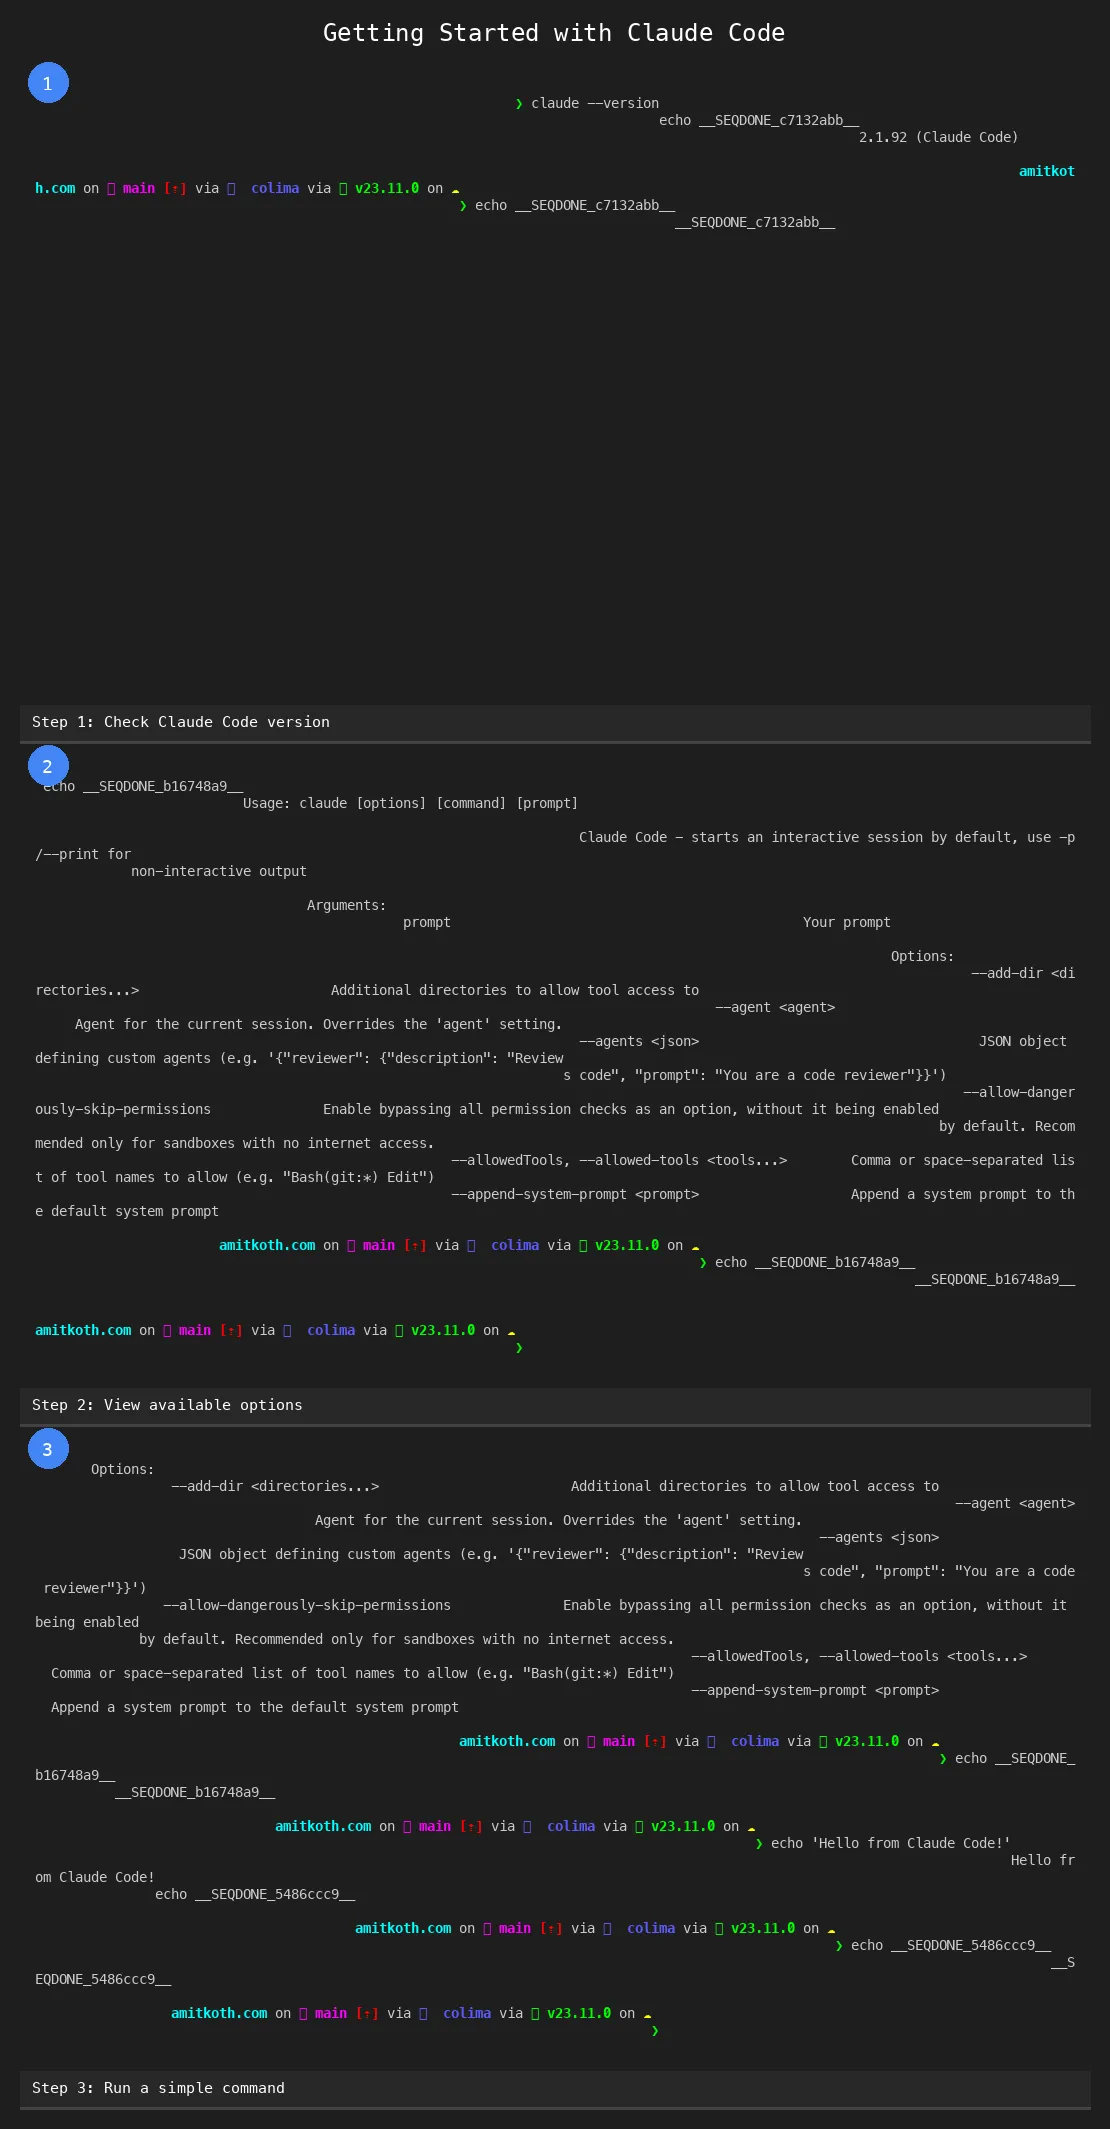
A single screenshot workflow is four commands:
CTL="python3 terminal_ctl.py"

$CTL create --name demo          # headless tmux session
$CTL send --name demo --command "git log --oneline -10"
$CTL screenshot --name demo --output demo.png
$CTL destroy --name demo          # cleanup
Video recording adds a background frame grabber. The record-start subcommand spawns a separate Python process that captures frames at the configured FPS (default is 4 frames per second). Each frame gets rendered to a numbered PNG in a temp directory. When record-stop is called, it sends SIGTERM to the recorder process and invokes ffmpeg to stitch the frames into MP4.
One gotcha with ffmpeg: the yuv420p pixel format (required for broad video player compatibility) demands even dimensions for both width and height. The ffmpeg command includes a scale filter, scale=trunc(iw/2)*2:trunc(ih/2)*2, to enforce this. Without it, you get cryptic encoding failures on images with odd pixel dimensions.
The Vimeo upload wraps PyVimeo’s client library. Videos go up as unlisted by default. The response includes both the Vimeo URL and an embed HTML snippet ready to paste into a blog post.
Here’s a recording of the entire workflow in action:
For multi-step workflows (think: a tutorial showing 5 sequential commands), the sequence subcommand takes a JSON file with steps and produces individual PNGs, a stitched composite image, and an HTML preview page. The steps JSON format is straightforward:
[
  {"command": "git init", "label": "Initialize repository"},
  {"command": "git add .", "label": "Stage all files"},
  {"command": "git commit -m 'initial'", "label": "First commit"}
]
Each step gets its own 1070x625 screenshot. The composite stitches them vertically with numbered badges and captions:
The HTML preview gives you a quick visual check before embedding anything.
Where this actually matters and what comes next
The obvious use case is blog posts and tutorials. Every screenshot in a tutorial series comes out at exactly the same dimensions, same font, same color scheme, same terminal width. No visual inconsistency between images. A 10-step tutorial that would take 45 minutes of manual screenshotting takes about 30 seconds of automated capture.
Developer onboarding documentation is probably a bigger win. Most companies have a “getting started” guide with terminal commands that gets stale because nobody wants to re-take all the screenshots when the CLI output changes. When the screenshots are generated from a script, you just re-run the script after updating the commands. CLI tool maintainers face the same problem. Your README shows terminal output that no longer matches the current version. With automated screenshots, your CI pipeline can regenerate the README images on every release.
In building Tallyfy, documentation freshness was always a pain point. Screenshots go stale. People notice. They stop trusting the docs. Automating the image generation removes the friction that causes staleness in the first place.
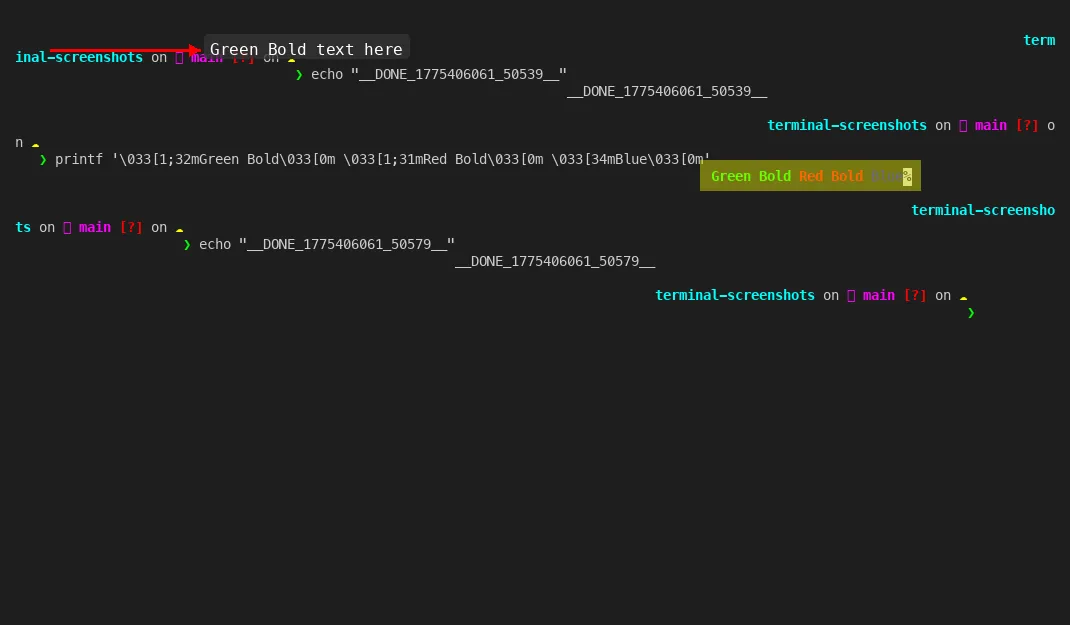
The annotation layer adds arrows, highlights, circles, and text labels on top of any PNG. Sort of a poor man’s Figma for terminal screenshots. Point an arrow at the relevant output line, highlight the error message in yellow, add a “Step 3” label in the corner. All from JSON arguments on the command line.
And then there’s the meta aspect. The screenshots and video in this very article were generated using this tool. Which is probably the most convincing demo possible. A tool that documents itself.
Running Tallyfy for 10+ years has taught me that the first version of any internal tool is always half right. This tool works. I’m keen on keeping it simple. But a few things are already obvious. The frame grabber captures at a fixed FPS regardless of terminal activity. 4 FPS is fine for most recordings, but it wastes frames during idle periods and can miss fast output bursts. An event-driven frame capture (triggered by tmux buffer changes) would produce smaller files and smoother recordings.
The Pillow renderer is correct but not fast. Rendering 130x35 cells individually with font lookups per cell is CPU-bound work. For a single screenshot it’s imperceptible. For a 60-second recording at 4 FPS (240 frames), it adds up. A Rust-based renderer using a monospace font atlas would probably be 50-100x faster. My guess is that matters only if you’re generating hundreds of recordings per day.
The clean screenshot pattern (clear-after plus re-send with no-wait) is a workaround, not an elegant solution. Ideally the tool would strip the marker from the terminal buffer directly before rendering. That’s a pyte buffer manipulation problem I haven’t solved yet.
No-brainer improvements aside, the tool does what it set out to do. It turns “take a screenshot of this terminal” from a manual, inconsistent process into a scriptable, repeatable one. Every image the same size. Every recording the same quality. Every upload one command away.
For anyone building developer documentation, CLI tutorials, or technical blog content, this pattern is worth stealing. The specific implementation (tmux plus pyte plus Pillow) is one approach. The principle (headless terminal, programmatic capture, automated pipeline) works with whatever tools fit your stack.
About the Author
Amit Kothari is an experienced consultant, advisor, coach, and educator specializing in AI and operations for executives and their companies. With 25+ years of experience and as the founder of Tallyfy (raised $3.6m), he helps mid-size companies identify, plan, and implement practical AI solutions that actually work. Originally British and now based in St. Louis, MO, Amit combines deep technical expertise with real-world business understanding.
Disclaimer: The content in this article represents personal opinions based on extensive research and practical experience. While every effort has been made to ensure accuracy through data analysis and source verification, this should not be considered professional advice. Always consult with qualified professionals for decisions specific to your situation.